Thursday, April 30, 2009

Glass Tile Necklaces

I found this little project on another blog and just had to try it. It only cost about $2-$3 each to make, and that includes the chain. I found the idea here. I am addicted. I made 10, gave out 4 as gifts and have already ordered 10 more glass tiles. So cheap and easy!

Mother's Day Gift


The boys went up to Cleveland last Saturday to go to Ray's Mountain Bike Park. I thought it would be a perfect day for the girls to get together and make Mother's Day gifts. I found the idea here. I found the card idea here. I found the cutest cans at Wal-Mart in the fruit section. It was canned peaches before I altered it. I won't say what I am putting in the can just in case my mom looks at this by next Sunday. * Update, I ended up putting one of the glass tile necklaces in the can. Both mom's liked them.

Fold Out Scrapbook

I made this little beauty for my Sister's birthday. I found the directions here. It was so fun to make and pretty quick & easy too! I had to go to 3 different restaurants to find the square coasters. I got a couple weird looks when I asked, but finally found them at The Outback. I hope she likes it. (click on picture to enlarge)

Wednesday, March 18, 2009

St. Patty's Day Banner


I made this a few weeks ago and should have posted it yesterday. Oh well. I am not going to post instructions on this one as it is pretty self-explanatory. Even though it is made with the Cricut, anyone can cut out similar shapes and add sticker letters or stencil letters onto them. Then just punch holes and string together with ribbon/fiber. You can also make these banners for any occasion-Birthday, Graduation, or any other holiday.

Let me know if you have any questions or further instructions are needed.

Vinyl Letter Tile


This is a very inexpensive ($2-$3) craft that adds flair to any room.

Supplies:
Tile from Home Depot or Lowe's ($1 each)
Either pre-cut vinyl letters or vinyl sheets to cut letters out of with a Cricut
Ribbons and other 'bellies
Hole Puncher

To Do:
There is a paper on the back of the tile, do not remove this as it is very sticky. You will have to trim the edges because the paper is usually a little bigger than the tile.
Find a quote or determine what you would like to out on your tile.
Arrange pre-cut letters/cut out letters from cricut
Stick on in whatever fashion suites you
Decorate with 'bellies (ribbons, buttons, etc)
Punch 2 holes in corners and add ribbon/fiber for hanging
You can also opt not to add the hanging ribbon and display with an easel

Enjoy and let me know if you have any questions.

Monday, March 16, 2009

Birthday Card


I made 2 of these cards for both of my brothers on their birthdays. I only got a picture of one because I had already sent the other out. They were different colors, but same layout. You could use this layout for other cards besides birthdays as well.

Supplies:
Patterned Paper
Solid BazzilCardstock
Stamps
Ribbons
Stapler and staples
Glue Dots

How To:
Determine your card size and cut it out of the bazzil
Cut out your pattern paper for just the front of the card and glue
Cut out a circle (any size) of the Bazzil
Stamp your image on this
Staple Ribbon to the circle
Use glue dots or foam stickers to stick circle onto card for a "pop-out" look
and then just add your own sentiment.
Good Luck and let me know if you have any questions.

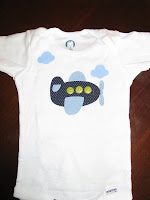
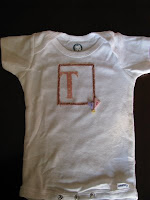
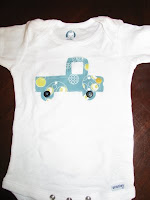
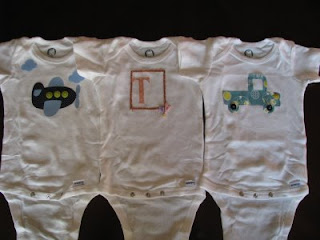
Cricut Onesies


I came across an article online that was talking about being able to cut out fabric with the Cricut. So, I decided to try out this fabric myth. It took awhile to get the right settings. I also had to have just the write type of fabric and wonder under. It worked amazing once I got it all figured out though.

Supplies:
Any size, color of onesie
Thicker, starchier cotton fabric
Wonder Under
Iron
Buttons or other embellishments
Thread
Cricut machine, Baby Bug or Expression
New Cricut Mat

How To:
Figure out what you want to cut out of the Cricut; you will also need to figure out what size you want it.
Cut out a square a few inches bigger than the item you want from the fabric and the wonder-under.
Iron wonder-under to back-side of fabric. Do not take off the paper, it helps with the cutting process.
Attach the fabric with wonder-under to your new mat. Use a rolling pin to make sure it is on real good.
Load mat into Cricut.
Set settings to medium and your blade to a 4. (You may have to mess around with your settings a bit to get it just right. I recommend testing out your cuts before wasting fabric)
Cut out your item.
Remove paper backing from the wonder-under and center on onesie.
Iron on and make sure it is really stuck good.
Now you can add buttons, sew around the edges or whatever else your imagination can think of.
Good luck and let me know if you have any questions.
Send me a link if you post pictures of your completed project.